Seagate Constellation ES.3 Firmware Update Process
This is the firmware update process we utilized to bring our drives up to the latest code base. With some variation, this process may be leveraged for other drives produced by Seagate. In order to achieve a successful outcome, the following prerequisites must be met:
- Drives will need to be connected to an onboard SATA port that is controlled by the chipset. Use of HBAs or non-Intel chipset-driven ports is discouraged.
- Available USB Flash Drive with 128MB or greater capacity.
- Internet access to download the applicable firmware.
- Available serial numbers for the drive(s) that will benefit from the updated firmware.
- Completed and verified backup of all data that may reside on the drive.
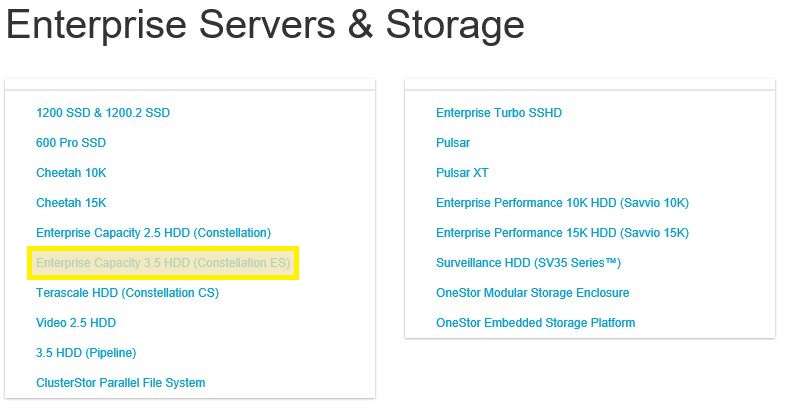
1.) Visit the Seagate Support Home page. Select the appropriate class of drive from the product list. In the case of the Constellation ES.3, select Enterprise Servers & Storage.

2.) On the Enterprise Servers & Storage list that appears, select the appropriate drive. In the case of this procedure, the correct option is Enterprise Capacity 3.5 HDD (Constellation ES).
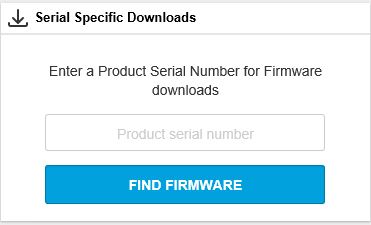
3.) The Enterprise Capacity 3.5 HDD (Constellation ES) page will appear. At the very bottom of the default Resources page is a text box titled Serial Specific Downloads. Enter the serial number of the drive in this field, and then click on the Find Firmware button.
4.) The results for available firmware will be returned if a newer release exists. Click on the returned Constellation ES.3 SATA Firmware Update link to obtain the SN06 firmware.
![]()
5.) Once the file has been successfully downloaded, unzip and extract the contents to a locally available drive. The results will provide a READMEFIRST PDF outlining some of the prerequisites that have already been outlined in this process. The other three folders contain directories for bootable tools, firmware, and linux cli tools.

Enter the bootable tools directory, and execute USBbootBuilder-16_Kernel4.3.0-SeaFlashLin-046.USBsetup application. Be sure to have the 128 MB or greater USB flash drive attached to the PC.
Within the application:
- Select the correct language and click OK.
- Click Next on the initial Linux USB Boot Maker prompt.
- Select the radio button to agree to the license, and click Next.
- Select the USB Flash drive from the drop down list on the page. Enable the This will erase… checkbox to permit the utility to wipe the USB flash drive and click Create.
- A format prompt will appear. Click the OK button.
- Watch the progress bar. When it completes, click the Close button to exit the application.
6.) Within Windows Explorer, return to the extracted firmware archive directory. Enter the firmware directory and locate the file with the .LOD extension. This file needs to be copied to the root of the USB flash drive. In the case of the specific drive we’ve noted that this process pertains to, the file name will be ConstellationES3-Megalodon-SATA-StdOEM-SN06.lod.
7.) Once the file has been copied over, insert the USB flash drive into the computer that contains the to-be-updated drive. Ensure the drive is connected to the onboard SATA controller on the motherboard. Power on the system and press the appropriate function key to load the boot menu. On both motherboards we have access to, this key is F11.
8.) Select the USB Boot Disk device that appears in the list, and permit the TinyCore Linux distribution to complete loading. Do not press any keys, as an automated script within the boot process will provide the device paths for the hard drives attached to the system.
9.) Once all scripts have finished loading, examine the list of devices that contain the legacy firmware (e.g. FN04). Use the seaflashlin tool using the following syntax to perform the firmware update:
seaflashlin -f ConstellationES3-Megalodon-SATA-StdOEM-SN06.lod -d /dev/<sg#>
Replace sg# with the correct device (e.g. if the drive part number, serial number, and legacy firmware are displayed for /dev/sg1, then the path that is entered after the -d (device) switch will be /dev/sg1).
10.) The actual update process will take less than a minute to complete. Repeat Step 9 for each additional drive that meets the firmware update criteria. Once completed, power down the system to ensure the update takes effect and that the drives are reinitialized with the updated firmware.